Blender Exporter
The OVB add-on lives in the 3D-view sidebar, under the OVB tab. It turns what your scene produces — Grease Pencil strokes, Pencil+ lines, or a rendered image — into the folder layout the Harmony importer reads, one frame at a time.
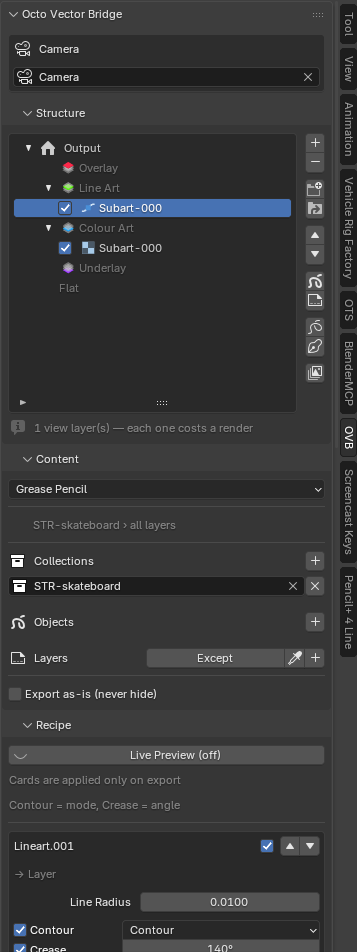
There is one tree and one button. You author the Structure of what Harmony will receive, say what each pass produces, and press Export Structure. The add-on runs whichever pipelines the tree asks for — Grease Pencil, bitmap render, Pencil+ — in the right order, on its own.
What a pass can produce
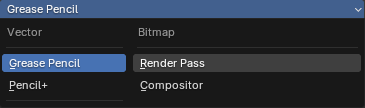
Every leaf of the tree is a pass — one export output, one subartlayer in Harmony (see Structure & Subartlayers). The Content panel's first dropdown says what the selected pass produces:
| Source | What Harmony gets | |
|---|---|---|
 Vector Vector |
Grease Pencil | your strokes, read directly, as SVG with the real per-point pressure — the thin-to-thick you drew is the thin-to-thick that lands. GP v3 and legacy GP. |
| Vector |
Pencil+ | PSOFT's stylised line generation. The EPS it writes is flat, so OVB reconstructs width and colour by sampling the raster render (Pressure → Variable Width in Settings). |
 Bitmap Bitmap |
Render Pass | a PNG sequence straight from a view layer's output — the beauty, or any pass / AOV the Render Layers node exposes. |
| Bitmap |
Compositor | a PNG sequence taken from a node of your own compositor tree — a baked glow, a graded image, merged layers. OVB connects to that socket and touches nothing else in your tree. |
Vector passes become editable Harmony pencil lines; bitmap passes become Toon Boom bitmap layers. Both can live in the same drawing, on different art layers — the importer reads them together.
Pencil+ is optional
Grease Pencil is the default source and needs nothing extra. The Pencil+ source needs PSOFT's Pencil+ 4 Line add-on and its separate Pencil+ 4 Render App (the paid part — the free Line add-on alone cannot draw lines). Without them the pass simply warns; nothing else in the add-on is affected.
Camera

The scene camera OVB projects from. Every pass — the raycast, the render, the Pencil+ frame — is measured from this camera. It sits at the top and never collapses.
Structure
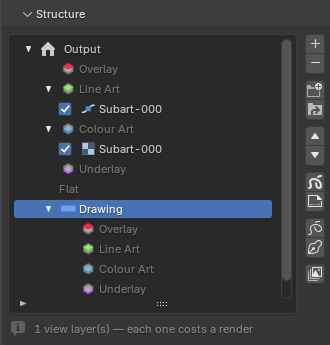
The tree is the folder layout the Harmony importer reads, and the importer's outliner is its mirror. Three levels:
 Drawing — a Harmony drawing (a Read node). Output is the root: it is the output folder and the root drawing at once, which is why it keeps its own house mark. A named drawing under it is a folder inside the output, and becomes its own Read node on import.
- Art layer containers — every drawing is born with Harmony's four, in z-order:
 Overlay,
  Line Art,
  Colour Art,
  Underlay — plus Flat, a pass that writes straight into the drawing's folder with no art layer of its own. Containers are fixed: they are never renamed and never hold art themselves.
 - Passes — the leaves. Each carries an enable box, its name, and the icon of what it produces: vector or bitmap. Several passes in one container become that art layer's stack, top to bottom in tree order — the position is the
NN_prefix on disk.
The chevrons fold a drawing or a container. A folded Output still lists its drawings, so the collapsed tree reads as a summary of what the export writes.
The button column
| Button | What it does | |
|---|---|---|
+ |
Add Pass | a new pass, born where the selection is: below a selected pass, last in a selected container, in a selected drawing's Line Art. |
− |
Remove | the selected pass, or a whole drawing with everything in it. |
| Add Drawing | a new drawing folder under Output, with its four containers. | |
| Add Existing Drawing | a drawing that already exists on disk — from another export's tree, or a real folder in the output — so two exports can share one drawing (SVG lines on Line Art from one, a bitmap on Colour Art from another). | |
| ▲ ▼ | Move Pass | up or down, crossing container edges — a pass walks the tree without drag. |
| Generate — per GP object / per GP layer | one Grease Pencil pass per object, or per object + layer. | |
| Generate — per Pencil+ Line / per Line + Line Set | one Pencil+ pass per Line, or per Line + Line Set. | |
| Generate — Render Passes | one bitmap pass per view layer of the scene. |
Generators are the one-click way to fan a whole setup out; each result is a plain pass you then edit.
One drawing mode per art layer
A Harmony art layer is either vector or bitmap. A container holding both kinds would lose one of them silently on import, so the tree flags it in red on the container row (vector + bitmap in one art layer) and the export refuses until you move one of the passes.
The line under the tree tells you the render cost: 1 view layer(s) — each one costs a render, and N compositor trees — N renders per frame when passes read different trees. A render-layer pass costs one full render of every frame; several passes on the same view layer share it.
Content — what the selected pass takes
The panel below the tree is keyed on the pass's source. Destination lives in the tree; only the what is configured here.
Grease Pencil
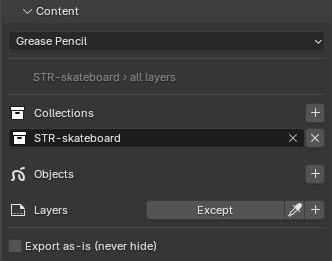
A filter over the scene. The summary line under the dropdown states what it resolves to (STR-skateboard › all layers).
- Collections, Objects, Layers pickers — each
+adds what you have selected in the viewport. An empty picker adds nothing (it is not "everything"); an empty filter means the whole scene. - Layers enables once a Collection or Object is picked (a layer belongs to an object). Each slot is a dropdown of the picked sources' layers; the eyedropper bulk-adds every layer they have.
- Except (on the Layers row) inverts the layer list — take every layer but these.
- An object already covered by a picked collection shows greyed — picking it again is redundant, and the grey says so.
- Export as-is (never hide) — skip occlusion for this pass: speed lines, x-ray notes, annotation.
Pencil+
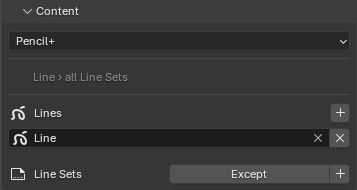
A filter over your Pencil+ setup. A Line is the source unit (the analogue of a GP object); a Line Set is the sub-unit inside it (the analogue of a GP layer) and is what carries the edge types and the brush.
- Lines — the Pencil+ Line nodes the pass covers. Empty = every Line.
- Line Sets — the Line Sets within the picked Lines; disabled until a Line is picked. Empty = every Line Set of those Lines. Except inverts it.
Render Pass
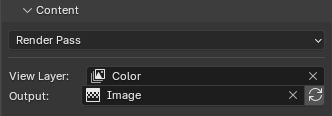
- View Layer — the view layer to render.
- Output — which socket of that layer's Render Layers node to write: the Image (beauty) or any pass / AOV it exposes. The list is read from the node itself, so a custom AOV shows up with no extra setup.
The pass writes PNG, RGBA, straight alpha, at the scene's resolution and percentage.
Compositor
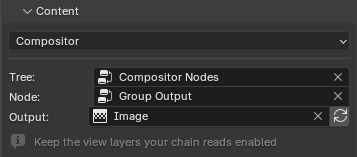
- Tree — the compositor node tree to read (the scene's, or a node group).
- Node and Output — the node and the socket OVB taps. OVB adds its own File Output beside your graph for the export and removes it afterwards; your nodes are never marked, moved or unlinked.
Keep the view layers your chain reads enabled — a disabled layer feeds nothing into the node you picked.
Recipe — how the pass is styled
The Recipe card appears for the two vector sources. It is stored per pass: the outline pass can want its Line Art on top with contour only; the inline pass the reverse — from the same modifiers.
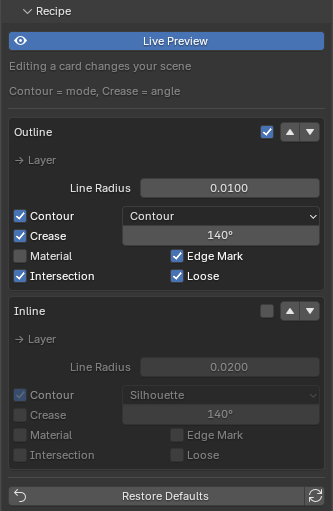
One card per Line Art or Thickness modifier OVB drives on the pass's objects:
- the name (the identity — how outline is told from inline);
- an On toggle — drives the render camera and the viewport monitor;
- ▲ ▼ — reorder the modifier within this pass;
- Line Radius (Line Art) or Factor / Thickness (Thickness modifier);
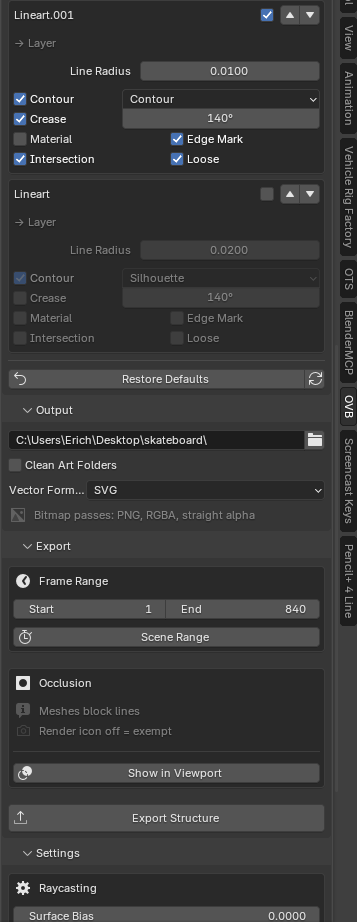
- the six Grease Pencil edge types — Contour (with its mode, e.g. Silhouette), Crease (with its angle), Material, Edge Mark, Intersection, Loose.
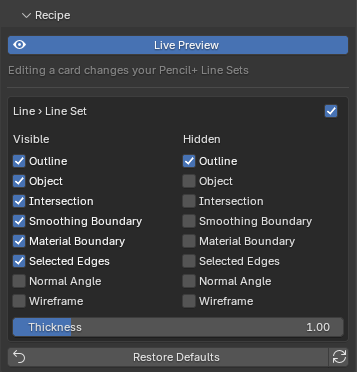
One card per (Line › Line Set) the filter resolves to, born from your Line Set's current setup:
- an On toggle for that Line Set;
- two independent columns, Visible and Hidden, over the eight Pencil+ edge types — Outline, Object, Intersection, Smoothing Boundary, Material Boundary, Selected Edges, Normal Angle, Wireframe;
- a Thickness multiplier —
1.00leaves your sizes alone; it scales every visible brush of the Line Set at once.
Live Preview is off by default
- Off: the recipe is applied only at export. Your viewport, your modifiers and your undo history are left untouched — Cards are applied only on export.
- On: the scene follows the selected pass, so the viewport shows what it exports — which writes to your modifiers or Line Sets on every edit.
Restore Defaults puts your own setup back (and resets the cards); the ⟳ button makes the current state the new default that new passes start from. Turning Live Preview off restores automatically — a preview never dirties your setup for good.
Output
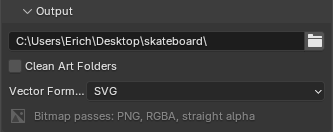
- Folder — where the tree is written. Point the Harmony importer at this folder.
- Clean Art Folders — opt-in and destructive: before exporting, delete
NN_pass folders a previous export left that this one no longer writes. Only folders OVB recognises as its own are touched. Off by default. - Vector Format — SVG, PDF or AI, for the vector passes. SVG keeps the per-point pressure (
data-widths); PDF and AI draw one width per line and the panel says so while either is chosen. An.aiis the PDF bytes with Illustrator's extension (a PDF container since Illustrator 9) — it opens in Illustrator with the paths editable. - Bitmap Format — TGA, PNG or TIF, and it applies to bitmap passes only. The list is short because these files are re-imported into Harmony: they need the alpha, or the art lands as a filled rectangle, and lossy compression degrades artwork that is on its way back into a scene. JPG is a Harmony-exporter choice, never a pass. This setting does not touch a vector pass: a Pencil+ vector pass outputs SVG, and the PNG written beside it is scaffolding the exporter uses to read the real stroke width back off the pixels, in its own temporary folder.
- Bitmap passes: PNG, RGBA, straight alpha — stated, not chosen.
Export
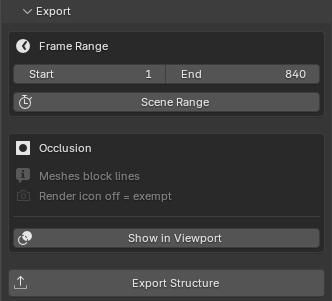
- Frame Range — Start / End, or Scene Range.
- Occlusion — the rule in two lines: meshes block lines, render icon off = exempt. Show in Viewport paints kept vs culled strokes from the camera before you commit. Grease Pencil only; the full story is on the Occlusion page.
- Fills — a Grease Pencil stroke that carries a fill (5.1's fill strokes) goes out as a filled path; one whose outline is hidden goes out as fill only, and a two-colour gradient material becomes an SVG gradient with the same axis. A fill is exported whole or not at all: occlusion cuts lines point by point, but a cut polygon is no longer a fill, so it stays while any point of it is seen and vanishes only when all are hidden.
- Export Structure — runs the whole tree. Order is cheapest and least contaminating first: Grease Pencil (no render) → bitmap (one render per frame, all passes) → Pencil+ (one render per frame per pass). The blocking checks — mixed kinds, name clashes, missing trees — run before anything renders, on the whole tree.
Import
The bridge in the other direction, shaped like the Harmony importer: a list you add to, then import. Add opens the browser: tick one .svg or several and each is a drawing; tick nothing and the folder you are in is the source, or highlight a folder and press Add Folder in the sidebar to take it without entering it — a drawing's folder, or a whole OVB export, read the way the Harmony importer reads it — drawings, art layers, and inside each art layer its tracks (frames loose in the folder, then NN_ subfolders by number, then the rest), each track vector (.svg) or bitmap (PNG/TGA/TIF). Frames loose in a drawing's folder name no art layer, so they come in on top of Line Art and the report says so. Nothing is dropped without a word.
What Add found is listed in the Import card: each drawing, each art layer with the suite's own glyph, vector or bitmap, how many tracks and frames — a tick per art layer, a remove per drawing, and you can add from several folders before deciding. Import Drawings runs on that list. Afterwards the panel in the bottom-left corner (or F9) rebuilds the result live while you change any option; that panel is the preview, and the list stays for another import with other choices.
- Vector art becomes Grease Pencil: one GP layer per track (
Line Art / outline), the Harmony exporter's per-point widths as stroke radius, colours as materials, a gradient as a gradient material with its axis on the stroke. - Bitmap art becomes an image plane per track (an image sequence when it has several frames), on the same plane and fit as the vector art, so the two register pixel for pixel. Bitmap Shader: Shadeless (colour and alpha straight to the output, blended) or Principled.
- Art Layers — the structure. Objects: every art layer is its own object, Grease Pencil for vector, image plane for bitmap, all in a Collection named after the drawing — animate and hide per art layer, as Harmony does. Layers: one Grease Pencil object per drawing, an art layer a layer (or a layer group when it has several tracks), bitmap tracks as image planes beside it. Objects on one camera plane are stepped a hair along the view by their stack rank, so Overlay stays over Underlay.
- Placement — Fit to Camera puts the drawing on a plane Distance metres in front of the active camera, proportions kept and centred, so an OVB export re-imports where the camera saw it. Without a camera: a world Plane (Front, Top, Side) at Metres per Pixel. Parent to Camera and Lock Transform are for reference art.
- Geometry — Curves: Bezier keeps one control point per SVG anchor with its handles; Points flattens, Curve Steps per curved segment. Thickness multiplies every radius; Uniform Thickness ignores the per-point widths.
- Frames — Keep Source Frame Numbers lands
0011.svgon scene frame 11, the same rule the Harmony exporter keeps. Otherwise the first frame lands on Frame Start, gaps preserved, and Hold stretches time. - Into — New objects, or the Active Object: layers found by name or added, frames added, an existing frame Skipped or Replaced.
- Materials — Reuse Materials takes an existing material of the same name as it is, so your recolour stays. Gradients: Gradient Material or Flat first stop.
Reload. An imported object remembers where it came from. With it selected, Reload in the Import card re-reads the source in place: a Grease Pencil object gets its layers and frames rebuilt, an image plane re-reads its image, and the object's transform, parent, modifiers and any material you recoloured stay yours.
Gradients in the viewport
In Solid shading with the colour set to Material, Blender draws every Grease Pencil fill flat — that is Blender's rule for that mode, not a lost gradient. Switch the viewport colour to Texture, or use Material Preview or a render, and the ramp is there.
Blender's own Import SVG as Grease Pencil still exists; it merges the art layers and drops the per-point widths, which is what this one keeps.
Settings
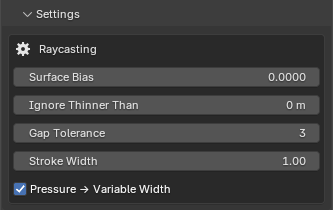
Shown for the selected vector pass.
Grease Pencil — Raycasting
- Surface Bias — shortens the occlusion ray toward the camera so a stroke lying on a surface is not blocked by that surface.
- Ignore Thinner Than — an obstruction thinner than this is walked through (the sliver test);
0switches it off. - Gap Tolerance — how many culled points a stroke may bridge before it is split in two.
- Stroke Width — the base width written to the SVG.
- Pressure → Variable Width — carry the per-point pressure into the SVG. Off exports a uniform width.
Pencil+ — Include hidden lines also exports the lines Pencil+ marks as hidden; Use pressure keeps the reconstructed variable width.
License
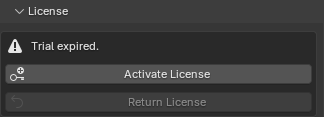
Trial status, Activate License and Return License — the Blender entry point of the licence that covers Blender, Maya and Harmony on this machine.