Frames & Exposure
A drawing's exposures live in an intrinsic Frames folder inside the slot.
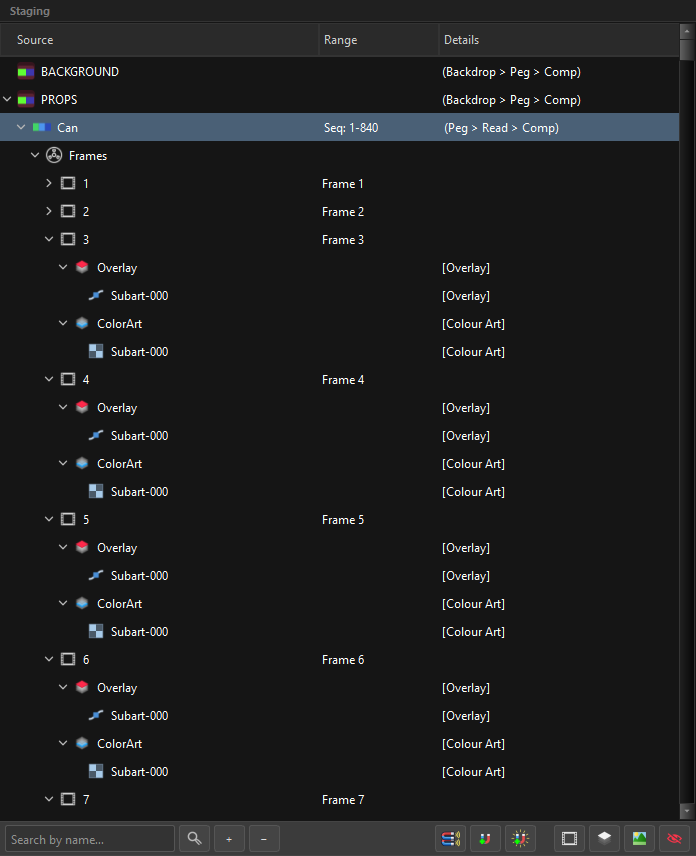
The Frames folder
 The Frames folder is created for you and is not a slot.
It is one of the two rows in the tree that are not ordinary slots (the other is a .tpl), and it exists to keep timing separate from structure.
It appears the moment a row becomes a drawing — ticking Drawing in the Inspector creates it, unticking removes it. If the row was already carrying artwork, that artwork migrates down into a frame 1 inside the new folder, because a drawing node cannot hold artwork itself: in Harmony the pixels always live in an exposed cel. See Concepts.
You cannot delete it — OSA blocks that, and says so — and you cannot turn it into something else. It appears when a drawing container has exposures, and it is always the container's first child.
Hide every Frames folder in the tree with the  toggle in the Staging toolbar when you are working on structure and the exposures are just noise.
What a frame is
A frame carries:
- a number — its position on the timeline,
- a duration — Start and End; when they differ the exposure is a hold,
- optionally its own artwork,
- optionally art layers beneath it.
The Range column reports it back:
| Shows | Means |
|---|---|
Frame 3 |
a single exposure at 3 |
Hold: 5-8 |
one drawing held across four frames |
Seq: 1-840 |
(on the container) the merged run of everything below |
Seq: 1-12, 20-24 |
two runs with a real gap between them |
Empty |
no artwork yet |
Gaps are reported, never closed silently. The number in the file name is the anchor — not the file's position in the list — so a missing file leaves a hole you can see.
Adding frames
Right-click a drawing (or its Frames folder) → Add Frames…, or press Ctrl+F.
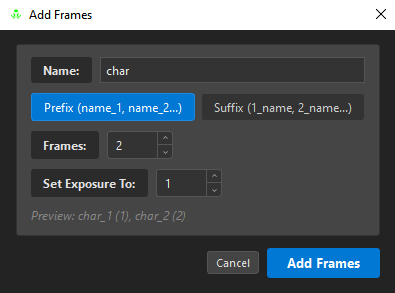
| Field | What it does |
|---|---|
| Name | the base name for every frame created |
| Prefix / Suffix | Prefix names them char_1, char_2…; Suffix names them 1_char, 2_char… |
| Frames | how many to create |
| Set Exposure To | the hold each one gets — 2 means every frame occupies two |
| Preview | the actual names and ranges you are about to create, live |
New frames are placed at the next available number, so adding to a drawing that already has 1–10 starts at 11 rather than colliding.
The preview is the contract
Read the preview line before pressing the button: it shows the real names and the real ranges, including how the exposure setting shifts each following frame. char_1 (1-2), char_2 (3-4) is two frames on a hold of two, not four frames.
Splitting and merging frames
Turning one exposure into many, or many into one, is guarded behind a setting — because it is destructive to timing in a way structural edits are not.
Enable Split/Merge Frames in the Browser's Settings section (bottom left) first. It is off by default. With it off, OSA refuses the operation and tells you which checkbox to tick, rather than doing something surprising:
Enable 'Split/Merge Frames' checkbox to merge/suck frames
With it on:
| Verb | Does |
|---|---|
| Split a frame | separates its art layers into their own exposures |
| Merge frames | combines the selected exposures into one, layers included |
| Merge Down | merges a frame into the one below it |
The artwork policy is the same one that governs the whole tree: nothing is discarded because the hierarchy changed. A frame's own artwork merges over the art layers it points at; sibling tracks on one art layer flatten in tree order, top first.
See Split & Merge for the full set of verbs, the two split modes and Vampire Mode.
Freeing a frame
A frame cannot carry a peg, a composite or an effect — those live on the drawing node above it, and the Inspector hides them rather than greying them. Untick Frame and the row becomes a drawing container again: the numbers are remembered, a Frames folder appears, and the art layers it was holding move into that folder — where they are free to become frames themselves.
Full mechanics: Conversions & Drag Conversion.
Why a frame carries artwork at all
Of the two rows that hold artwork, the art layer is the obvious one. The frame needs an explanation, and it is Original Bitmap.
In that mode the artwork does not live in any art layer — there are none. So it needs a home, and the frame is it: the exposure is the one thing that certainly exists for every drawing in Harmony, so OSA uses the frame container as the artwork's place. It is a home OSA keeps for its own bookkeeping — Harmony sees an exposed cel, which is what an exposure is anyway.
Once the frame is that place, the Target Layer on the container earns its keep, and it works in both directions:
| Mode | What the pointed-at layer means |
|---|---|
| Art Layers | where the frame's own artwork goes — it merges over that layer |
| Original Bitmap | what to compose — that layer's whole subart stack flattens into the frame |
The second one is the mirror of the first, and it is the reason the pointer exists at all in a mode with no art layers. See Original Bitmap.
Frames and art layers together
A frame can hold both its own artwork and art layers under it. That is not a corner case — it is the direct consequence of every row being the same row (see Concepts), and it is what lets you drag a file onto an exposure without losing what was already there.
The Details column tells you where each frame's own art will land:
3      Frame 3      [Overlay]
4      Frame 4      [Colour Art]
…and in Original Bitmap mode it says [Original Bitmap], because there is no layer to name. See Original Bitmap.
Z-Depth per frame
A frame can carry its own z-depth, which the Details column shows as Z: 0.5F. Write it in the name as a tag (0.5F, 10B, Z0.1) or set it in the Inspector.
 forward ·
  back — the frame icon itself changes when a depth is set, so a timed-and-depthed exposure is visible without opening anything.