Effects
An effect is a node OSA builds after the slot's composite. Every slot can carry a chain of them, and the chain is authored in the Inspector's Effects Nodes block.
Why these effects, and not others
This catalogue was not designed as a wish list of nice filters. It is mostly the Photoshop file, translated.
A PSD arrives carrying things that have no shape in Harmony until something builds them a node: a layer at 60% opacity, a clipping mask, a blend mode set to Multiply, an adjustment layer with a curve on it. Import those as flat pixels and the intent is gone — baked in, unreadable, unadjustable. So OSA gives each of them a node:
| What the PSD carries | The node OSA builds |
|---|---|
| Layer opacity | Transparency |
| Clipping mask | Cutter |
| Blend mode | Blending |
| Brightness/Contrast, Hue/Saturation, Levels adjustment layers | the matching colour filter |
That is the rule, and it explains the shape of the list better than any aesthetic argument: an effect is here because something in the file needs somewhere to land.
The exceptions were measured, not guessed. Blur carries nothing from the PSD — it is here because compositors reach for it constantly in Harmony, and a slot that can be authored with its blur already wired saves a round trip through the Node View every single time. Glow, Tone and Highlight earned their place the same way: used often enough that building them by hand is a tax.
And the same test is why the list stops where it does. An effect that would be used rarely is not free — it is one more row in every menu, one more tag to learn, one more thing to keep working. If it is not in this list, the answer was not often enough to pay for itself — and Harmony's own Node View is one click away for the rest.
The chain
Effects are wired in series, and the list order is the wiring order — top runs first.
That is why the block says so, permanently, as soon as there are two of them to order. One effect has no order to explain; two do.
Each row carries the same three verbs on the right:
| Button | Does |
|---|---|
| ▲ | move up the chain |
| ▼ | move down the chain |
| ✕ | remove this effect |
Adding one
Press + at the bottom of the block:
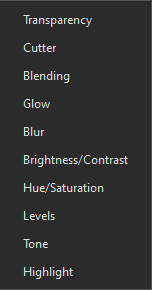
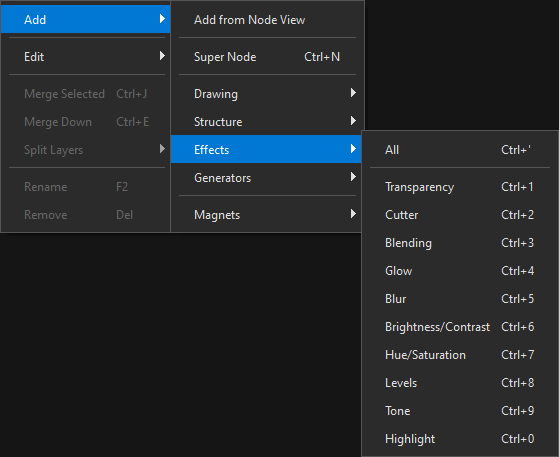
The list is subtractive — it only offers effects the slot does not already have, and the button disables itself when there is nothing left to add. There is no "All" here: All is a create verb in the tree's context menu (it makes a new node carrying every effect), while + adds one link to the chain of the slot you already have.
You can also add effects from the tree: right-click → Add → Effects.
…or by tag, before anything is staged: shadow=OP-BLR.
Names
Every effect gets a name derived from the slot plus a suffix — Effects-OP, Effects-CUT, Effects-BLR. The  link button keeps the name following the slot: rename the slot and the effect follows. Unlink it
  to type a name of your own that survives renames.
Where they land in the Node View
The Wide Bus reserves a strip of five slots (OP, CUT, BLD, GLW, BLR) under composites that are direct children of the backdrop or of the super node itself. Because the strip is reserved rather than allocated when needed, adding an effect later does not push the rest of the graph sideways.
Transparency
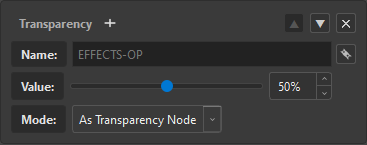
| Control | Does |
|---|---|
| Value | opacity, 0–100 %, on a slider paired with a number field |
| Mode | As Transparency Node or As Flat Transparency |
The Mode combo is the important one, and the two answers are genuinely different things:
-
As Transparency Node
A
Transparencynode is created in the Node View, wired after the composite. The opacity is a live, animatable attribute you can key in Harmony afterwards. This is the default. -
As Flat Transparency
No node is created. The opacity is baked into the pixels' alpha at import time. This is what you want when the transparency is part of the artwork rather than a rig control.
Tag form
OP adds a Transparency; OP50 adds one already set to 50.
Cutter
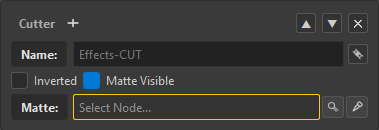
Cuts the artwork against a matte.
| Control | Does |
|---|---|
| Matte | the node that provides the cutting shape |
| Inverted | keep what is outside the matte instead of inside |
| Matte Visible | whether the matte drawing itself renders |
The Matte field is a node selector with two ways to fill it: the  search button, and a pick button that lets you grab the node from the scene.
A Cutter with no matte is flagged with a yellow warning on the field. It is not an error — you may be about to pick one — but it is the one effect that does nothing at all without its second input, so OSA refuses to let it look finished.
PSD layer masks arrive here
When a PSD adjustment layer has a layer mask, OSA wires the mask into the matte port automatically. See PSD Adjustment Layers.
Blending
One control — Mode — with the blend modes grouped exactly as Photoshop groups them, separators and all:
| Group | Modes |
|---|---|
| — | Normal |
| Cancelling | Erase, Invert, Replace |
| Darken | Colour Burn, Darken, Linear Burn, Multiply |
| Lighten | Colour Dodge, Lighten, Add, Screen |
| Contrast | Hardlight, Linearlight, Overlay, Pinlight, Softlight, Vividlight |
| Comparative | Difference, Divide, Exclusion, Subtract |
| Component | Colour, Hue, Saturation, Luminosity |
The grouping is not decoration: it is the same reading order you already have in Photoshop's own menu, so a layer set to Linear Burn there is found in the same place here.
Glow
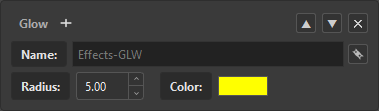
| Control | Does |
|---|---|
| Radius | how far the glow spreads |
| Color | the glow colour, with alpha |
The colour button opens the suite's own colour picker, dressed in the dark palette rather than the OS dialog.
Blur
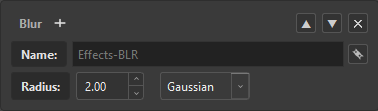
| Control | Does |
|---|---|
| Radius | blur amount |
| Type | Gaussian, Box or Radial |
The Type combo changes which Harmony node is created — this is not three settings of one node, it is three different nodes behind one row.
Colour filters
Five effects that came in with the Photoshop-adjustment work. They exist so a PSD's adjustment layers have somewhere real to land — see PSD Adjustment Layers — and they work perfectly well on their own.
Brightness/Contrast
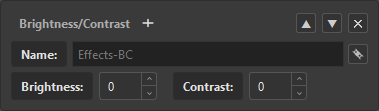
| Control | Range |
|---|---|
| Brightness | −100 … 100 |
| Contrast | −100 … 100 |
Both values come across from a Photoshop brit adjustment layer directly.
Hue/Saturation
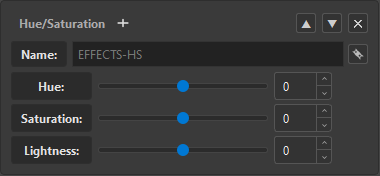
| Control | Range |
|---|---|
| Hue | −180 … 180 |
| Saturation | −100 … 100 |
| Lightness | −100 … 100 |
These are the Master trio — the three sliders Photoshop shows when the dropdown is set to Master. The per-colour ranges (Reds, Yellows, Greens, Cyans, Blues, Magentas) are three more sliders each; they are deliberately not staged here, and anyone who needs them adjusts in Harmony.
Levels
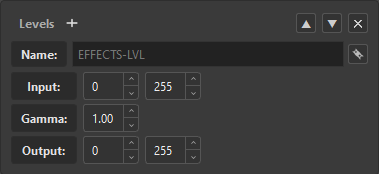
| Control | Range |
|---|---|
| Input — In Black / In White | 0 … 255 |
| Gamma | 0.10 … 9.99 |
| Output — Out Black / Out White | 0 … 255 |
This is the RGB composite record — the first of the 29 records a Photoshop levl layer carries. The per-channel ones (Red, Green, Blue, Alpha) stay out, for the same reason as the Hue/Saturation ranges.
Numbers rather than sliders, on purpose: these are points on a 0–255 scale, and Photoshop itself edits them with a three-handle histogram, not with three bars.
Tone and Highlight
| Control | Does |
|---|---|
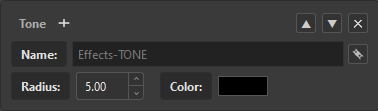
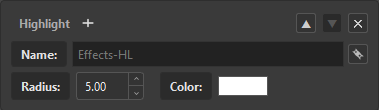
| Radius | spread |
| Color | the tint |
Tone and Highlight are measurably identical to Glow — radius plus colour — and they are in the catalogue for the same reason Glow is: they get used. Tone defaults to black, Highlight to white.
The whole set
| Effect | Tag | Controls |
|---|---|---|
| Transparency | OP |
Value, Mode |
| Cutter | CUT |
Matte, Inverted, Matte Visible |
| Blending | BLD |
Mode (25 blend modes) |
| Glow | GLW |
Radius, Color |
| Blur | BLR |
Radius, Type |
| Brightness/Contrast | BC |
Brightness, Contrast |
| Hue/Saturation | HS |
Hue, Saturation, Lightness |
| Levels | LVL |
In/Out black & white, Gamma |
| Tone | TONE |
Radius, Color |
| Highlight | HL |
Radius, Color |
Every one of these is a row in a single table inside OSA, which is why a new effect becomes a valid tag, a menu entry and an Inspector row on the day it is added — and why the + list can never drift out of sync with the tree's menu.
Effects belong to the aggregate
An effect on a super node applies to the whole unit, not to one drawing inside it. With a composite present, that is unambiguous — the comp is the aggregate. Without a composite, OSA only accepts the effect when there is exactly one content holder, because otherwise the chain would hang off one branch while the others passed by outside it, and "transparency on the super node" would quietly mean "transparency on one of its four drawings".