Keying & Auto-Capture
What a key is
A key is a frame number.
ORC does not store your pose. It stores the number of the Harmony frame where you posed the character. At Compose time — and only then — it reads the rig live at those frames.
Everything below follows from that:
- Keying is instant. Pressing F6 writes a number. There is no round trip to Harmony, nothing to wait for.
- A layer can key with zero targets. The frame belongs to the layer, not to the nodes. You can lay out a whole grid of frames before you have decided what it moves.
- Undo never touches your scene. Compose is the single place ORC writes to Harmony.
- Editing is non-destructive. Go back to frame 861, fix the eyebrow, re-compose. The change comes with it.
Setting and removing keys
| Key | Action |
|---|---|
| F6 | Set Key / Capture |
| F7 | Remove Key |
These two come from your Harmony configuration — they are whatever you have bound to Insert Keyframe and Delete Keyframe. Change them in Harmony's Edit → Keyboard Shortcuts; ORC follows, and will not let you rebind them on its side.
F6 and F7 follow your mouse, not your focus
They dispatch on what the cursor is hovering, which is why they work while a spin box has focus.
| Hovering | F6 keys |
|---|---|
| The Navigator's grid | The active layer, at this snap |
| A pose layer's grid | That layer, at that snap |
| A driver's knob | That driver's value |
| A look-at field | That one field |
| The look-at joystick | Every look-at field at once |
| Nothing relevant | Nothing — the key is swallowed |
After a successful capture, every visible grid cursor flashes green and the status line reads "Captured 12 target(s) @ frame 861 (Eyebrows)".
When it refuses
| Message | Meaning |
|---|---|
| "This extreme is shared from the Front (read-only) — author it on the Front face." | A shared side belongs to the front face. |
| "No targets to capture." | Nothing to pose — though in frames-first the layer's frame is still recorded. |
The frames-first loop
- Click a snap in the layer's grid.
- Go to an empty frame in Harmony's timeline.
- Pose the character with Harmony's own tools.
- With the cursor over ORC's grid, press F6.
The snap turns green and shows the frame number.
Left-click does not move your playhead
Clicking a navigator snap moves the rig cursor but leaves the timeline alone, so you can keep stamping keys without the playhead running away. Middle-click and the arrow keys do jump.
If you navigate to a snap that has no keyframe yet, ORC tells you rather than loading anything: "This snap has no keyframe yet — run the Unroll Wizard (or key the rig) to populate it."
Typing frames directly
You do not have to stand on a frame to key it.
| Gesture | Effect |
|---|---|
| Double-click a snap | Inline editor. Accepts arithmetic. 0 clears the snap. |
| Shift + wheel | Step that snap's frame ±1. |
After a single frame edit, ORC jumps Harmony to the frame you typed and runs auto-capture for that side. After a bulk write — a fill, a preset — it does neither: a bulk write is a data operation, and you are not standing at those frames. (A 7 × 3 grid over a 13-position knob is 273 snaps; you do not want 273 timeline jumps.)
Auto-capture
The small dot at the right of the editor's address bar — off, on. It starts off, and its startup state is a preference.
Auto-Capture frames (On) When ON: empty snap points auto-capture deformations + drawings AND record the current Harmony frame for the pose.
With it on, moving onto an empty snap records the frame you are parked on. Pose, move, pose, move — no F6.
It deliberately refuses in four cases:
| It will not fire when | Why |
|---|---|
| The snap already has data | An authored frame is data. Overwriting it with the playhead is how you lose work. |
| The timeline never moved | If the snap you just left already owned this frame, stamping would just leak that number forward. |
| The layer is a control's knob | Its dimension already belongs to the control, so auto-capture leaves it alone. You can still key it by hand. An extra knob auto-keys like any layer. |
| The mode is off |
Frame symmetry
A frame authored on any page authors to every page.
All pages of a layer share one frame per snap — pages differ in which nodes they drive, not in when the pose happens. So one gesture stamps the same snap across every page, and you never have to key the same expression three times.
Removing keys
There are two ways to clear a snap, and they reach the same place:
Remove Key— F7, or the snap's right-click menu. On a snap the reference has a frame for, the emptied cell keeps the yellow ring — removal is divergence too.- Typing
0into the snap, which is just an edit whose new value happens to be "none".
Either way the snap empties, the number goes back to —, and the dot goes grey. Both are mirror-aware: with mirroring on, the flipped snap clears too, because a frame edit always writes the twin — putting a number in or taking it out.
The one thing worth remembering is what does not happen: neither of them touches the pose. See below.
A snap holds a frame, and that is all
It is worth being precise about what gets removed, because it is less than it sounds. A snap stores one thing: the frame number. The pose itself — the deformations, the transforms, the exposed drawing — is never copied into the rig file; it stays on the Harmony timeline, and Compose reads it live at that frame.
So removing a key does not delete a pose. It forgets where the pose was. The drawing at that frame is still sitting in your scene, untouched, and re-typing the number brings it straight back.
Bulk clears
All in-memory and all undoable, which is why none of them asks for confirmation.
| Command | Clears |
|---|---|
Clear Snap Pose · All Pose Layers Ctrl+Delete |
This snap, across every layer |
Clear Pose Layer Keys at Current MC Snap |
This layer, at the current control snap |
Clear Pose Layer Keys (Current Knob) |
This layer, on the active knob only |
Clear All Pose Layer Keys |
This layer, everywhere |
Clear Current Knob (All Pose Layers) |
Every layer, current knob only |
Clear All Keys |
Everything |
Only the first has a shortcut by default. Bind the others in Preferences if you use them, and the combos appear beside them in the right-click menus.
Each reports what it did — "Cleared 84 snap(s)" or "Nothing to clear".
The context menus
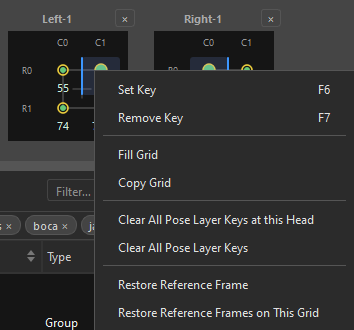
| Item |
|---|
Set Key F6 |
Remove Key F7 |
Fill Grid |
Copy Grid / Paste Grid |
Clear All Pose Layer Keys at this Head |
Clear All Pose Layer Keys |
Clear Pose Layer Keys at this Knob |
Restore Reference Frame / …on This Grid |
Suppressed entirely on a knob's grid and on a shared side column.
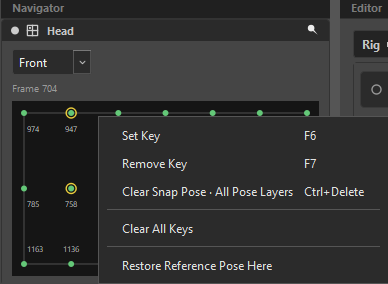
| Item |
|---|
Set Key F6 |
Remove Key F7 |
Clear Snap Pose · All Pose Layers |
Clear Current Knob Keys · All Pose Layers |
Clear All Keys |
On a 1-D control — and on a knob, or the pose layer a look-at or a driver keys across — the Navigator shows a slider instead of a grid. It carries the same menu, the same five actions: the gesture must not depend on which shape the navigator happens to take.
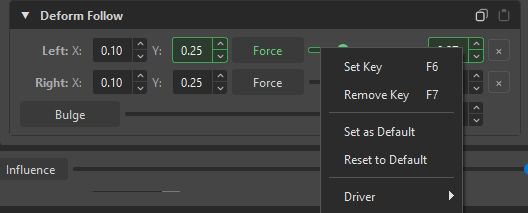
| Item |
|---|
Set Key F6 |
Remove Key F7 |
Set as Default |
Reset to Default |
Driver ▸ |
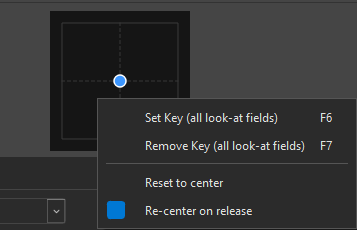
| Item |
|---|
Set Key (all look-at fields) F6 |
Remove Key (all look-at fields) F7 |
Reset to center |
Re-center on release |
Reading what is keyed — and what changed
| Mark | Where | Meaning |
|---|---|---|
| A grid | The active node has a key at that snap | |
| A slider | The active node has a key at that tick | |
| A grid | That snap's frame has changed since the rig was brought in | |
| A slider | That tick's frame has changed since the rig was brought in — carried on the tick's head, since a line has no outside to ring | |
| A grid | Removed — empty, but the reference has a frame here that was deleted | |
| A slider | Removed on a slider — the tick goes empty with a yellow head | |
| Frame number | A grid | Which frame that snap points at |
| A green flash on the cursor | Every visible grid and slider | A key was just recorded |
The Navigator shows only the active node's keys. On a driver page, the pose green is suppressed at source and replaced by that driver's keys — otherwise a rig that keys every snap would light up completely and tell you nothing.
Related
- Grids & Snaps — the surface you key on
- Fill Grid & Fill Dimensions — keying many snaps at once
- History & Undo
- Compose — where the frames finally get read